

The codes for your permanent markers can be found on the website under markers>marker codes. The colour of the set is indicated by the colour of the single (right hand box) letter for type B sets and by a tiny coloured triangle in the bottom right hand corner of each marker for type C sets or you can locate the set colour by locating the code on the “Marker Codes” sheet on this website as all codes are unique.
Positioning Control Markers
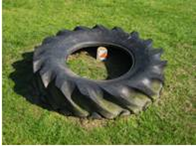
Markers should be placed on specific features shown on the map, individually marked trees, gates, building corners etc. They should not be on vague features such as a tree in the middle of a patch of woodland unless it stands out clearly and is marked individually on the map. Likewise “hedge” is not adequate, although “end of hedge” is specific and would be fine. “Middle of hedge” is not good if the hedge is long.
Markers should be placed so that they are easily visible when the youngster is at the named feature. So no deliberately hidden markers. Strictly, if the control description says boulder (rather than “boulder N. side”) then the marker should be visible from any side. This is not normally necessary on a simple (e,g, school) site. If you position a marker on a specific part of the hill (e.g. west side) the control description would be “Hill, west side”. The marker need only be visible when a competitor can see the west side. Fairly soon a pathway will develop to markers anyway!
Exactly where control markers are placed depends on the age and more importantly the experience of the youngsters. In the early stages they need quick success to boost their confidence. Markers should therefore be placed in an obvious position, facing the expected direction of approach. More experienced children will find that a simple site such as a school is not very challenging, and markers may be placed in less obvious positions, on the far side of objects, which is entirely fair provided the control description specifies this. In practice a course can be designed so that it is considerably easier done in one direction than doing it in reverse – a useful method of differentiation for a mixed ability group. In practice simple control descriptions such as “Tree” are usually preferred, and unless the tree is very large youngsters will not take long to see the marker even if it is not facing them as they approach.
Markers should be placed relatively low; eye-line level for the children involved, rather than adult eye-line, unless it is necessary to place them higher to avoid vandalism (in which case the children should be told that the control markers may be positioned high up) or lower if the object is small.
Mounting Control Markers
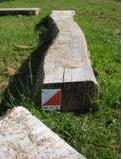
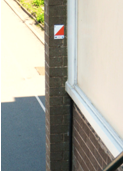
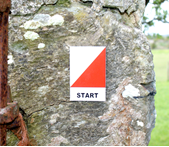
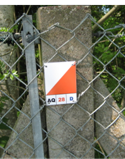
The markers can be mounted on most flat (or slightly curved – e.g. large trees) surfaces. They are always mounted with the orange triangle as the lower right part of the square. If there is the possibility of wanting to remove the markers in the future (e.g. replacement of a fence, moving a bench or picnic table which is a control site etc.) it will be best to fix the markers with screws, but there are numerous options:-
They can be easily be screwed into wood. We can supply stainless steel screws for this purpose. Alternatively brass screws may be used. If steel screws are used they should be galvanized or passivated as untreated steel will rust quickly and can lead to brown staining on the marker. Even treated screws may rust after some years.
On flat brick or block surfaces they can be fixed with screws screwed into plastic plugs. To drill holes for the plugs will require more power than basic battery drills can provide. Use a masonry (tungsten carbide tipped) drill bit and set the drill to “hammer action”. A good quality drill bit (e.g. DeWalt) will drill faster and last longer than cheap drills, enabling more holes to be drilled on one battery charge. If fixing into a brick wall the mortar lines will be easier to drill than the bricks themselves, although any mains drill should cope with brick easily enough
For permanent fixing to brick or stone use glue. Application with a mastic gun is both easier and cheaper than using tubes of glue. “No Nails” or similar PVA glue is fine on smooth flat surfaces. On irregular surfaces (e.g. boulders or stone walled buildings) use a gap filling adhesive such as “Gripfill”. Personally I favour epoxy resin glues such as araldite. Markers on vertical serfaces may need to be held temporarily with adhesive tape while the glue sets. Make sure that the edges of the marker are glued down to make it difficult to get screwdrivers or penknives behind them, and check the area where the marker is to be affixed is reasonably clean – sticking it to a patch of lichen may not work!
On glass (or indeed many other materials) use a silicone mastic – a general purpose one is OK, but ideally for glass use a glazing mastic. These are effective, but difficult to clean off excess, so take care to apply only the right amount and put it on the marker to avoid it spreading too far .
If you want to use a bush as a control site consider placing a short post beside it and fixing the marker to the post. Half round fence posts are cheap (around £3 each), and provide a flat surface for fixing. Cutting the post down to half means there is little leverage and it be far less tempting to try to pull out and you can get two posts for the price of one!
If using a wire netting fence (e.g. corner or gate of a tennis court) the plastic marker can be drilled and wired on to the netting, or fixed with cable ties. Although the marker should be fixed on the outside the fixing wires should be twisted together behind to avoid them being undone by idle hands. Stiffer wire which requires pliers to twist it is obviously better. Cut ends off short for safety and to make undoing the wires or ties difficult without tools.
Fixing to small radius curves (e.g. drainpipes) should be avoided. Fix beside such things if possible. Markers should also not be fixed to ground surface items such as drain covers, or to the ground (e.g. the corner of the playground) as they are not designed to take heavy wear. If you want to use a feature where there is no suitable place to position the marker (e.g. playground corner) then consider using a temporary marker taken out for the lesson. You can fix the marker to a cone or a 1 pint plastic milk bottle part filled with sand and/or cement (so it stays in place in a wind),
© Celtica Mapping 2011 - 2020
Installing Permanent Markers
Download a copy of these instructions


| Animal Bird and Car Anagrams |
| Marker codes |
| Marker Installation |
| Mapping FAQ |
| How we map |
| about us |
| full T and C |